Generate Events from Signals
This guide details how to use signals and their associated data, generated in one of the Signals SDKs with the Auto-Instrumentation dashboard in your Segment workspace. On this page, find details on:
- Creating custom rules to capture and translate signals into actionable analytics events.
- Example rules that you can use as a basis for further customization.
This guide assumes that you’ve already added the Signals SDK to your application. If you haven’t yet, see the Auto-Instrumentation Setup guide for initial setup.
Auto-Instrumentation in public beta
Auto-Instrumentation is in public beta, and Segment is actively working on this feature. Some functionality may change before it becomes generally available.
Regional availability
Auto-Instrumentation isn’t supported in EU workspaces.
Converting signals to events
After you set up the Signals SDK to capture the signals you want to target, you can create rules in your Segment workspace to translate the captured signals into traditional Segment analytics events. These rules are deployed in your application the next time a user launches your app.
The process works like this:
- The SDK sends raw signals from your app or website to Segment.
- You build event rules in your workspace that define how those signals should become analytics events.
- You publish the event rules.
After publishing, Segment analyzes user interactions in your app or website against these rules and automatically generates analytics events when matching interactions occur.
Getting started with rule creation
- Ensure you have the
Workspace OwnerorSource Adminrole in Segment. If your source is connected to a tracking plan, you will also need, at a minimum, theTracking Plan Read-onlyrole. To view the content in the Event Builder tab, you will need, at a minimum, theSource Read-onlyrole. - In your Segment workspace, go to Sources and select a source.
- Open the Event Builder, then click Create Rules.
Where's the Event Builder tab?
The Event Builder tab only appears after you’ve enabled Auto Instrumentation under the Analytics.js tab in the source’s settings. If you don’t see the tab, reach out to your Segment CSM.
Using the Rules Editor
The Rules Editor is where you define rules that transform raw signal data into analytics events. Using the dropdown-based editor, you can:
- Combine multiple signals into a single event (for example, a click followed by a navigation).
- Set conditions to control when events should be triggered.
- Assign custom event names.
Tracking plan integration
If your source is connected to a tracking plan, you can quickly confirm that a rule’s event and properties are planned. When creating or editing a rule, choose an event by typing its name or selecting from the tracking plan’s events in a dropdown. Similarly, add properties by typing their names or selecting from the event’s properties in a dropdown. The Planned column, shown next to each property mapping and in the Event Rules table, indicates whether the property or event is planned.
Adding event properties
You can enrich your events by adding properties based on signal metadata. For example:
- Capture
product.pricein your Add to Cart event. - Add a boolean field like
couponAppliedto your Order Completed event.
These properties are sent alongside your event, giving your team deeper insights without requiring any manual instrumentation.
Example rule implementations
You can use Signals to create tracking rules using the event builder.
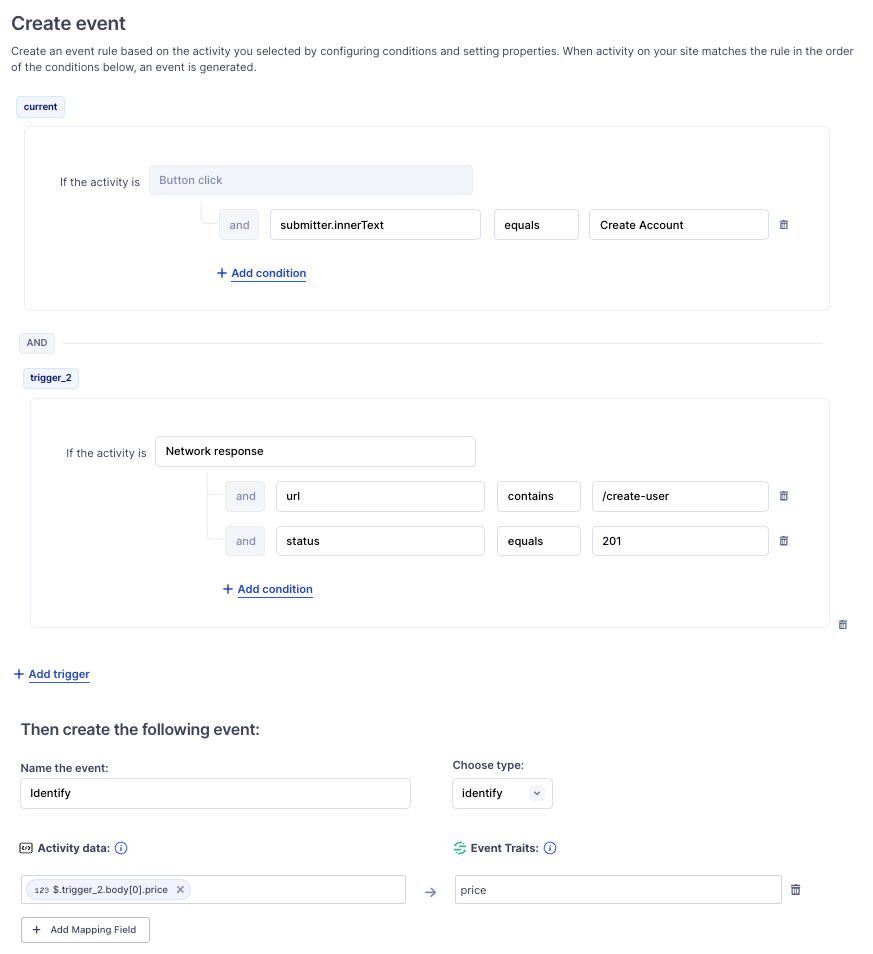
Example: Identify users
The following screenshot shows an Identify event rule that combines a button click with a successful network response to extract user data and trigger an identify call.
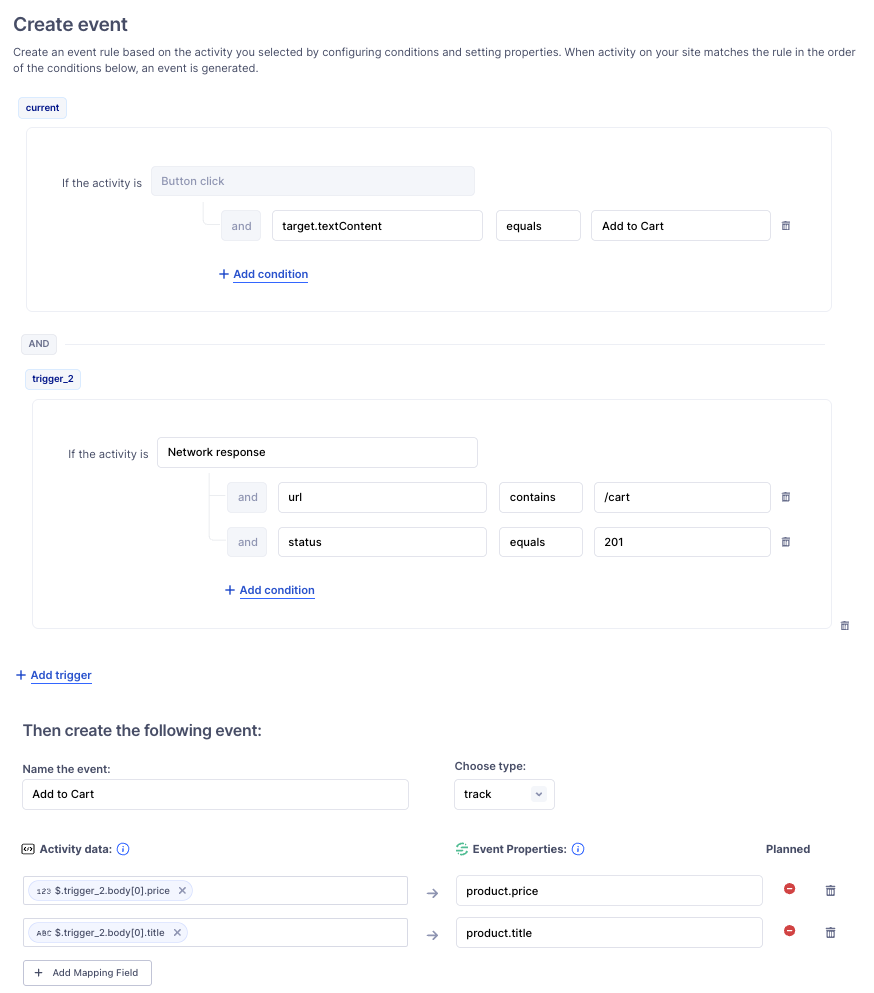
Example: Track Add to Cart events
This rule implements a core ordering event from the e-commerce Spec. It shows a Track event triggered by a button click and a network response, with product details from the response mapped to event properties.
This page was last modified: 30 Oct 2025
Need support?
Questions? Problems? Need more info? Contact Segment Support for assistance!